
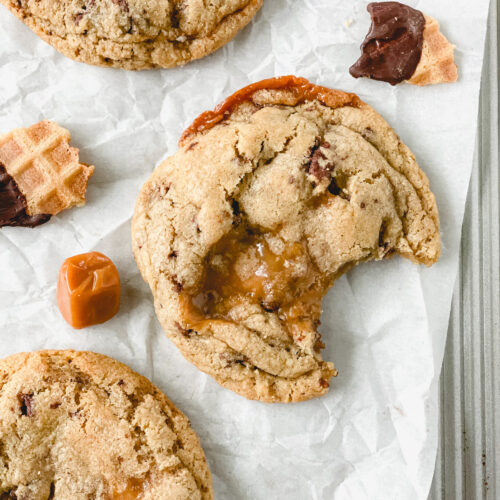
Caramel Cone Crunch Cookies
Crunchy chocolate-covered waffle cones and pools of creamy caramel. These Caramel Cone Crunch Cookies are the perfect bite of summer and my version of the “Americone Dream” ice cream, in a cookie!

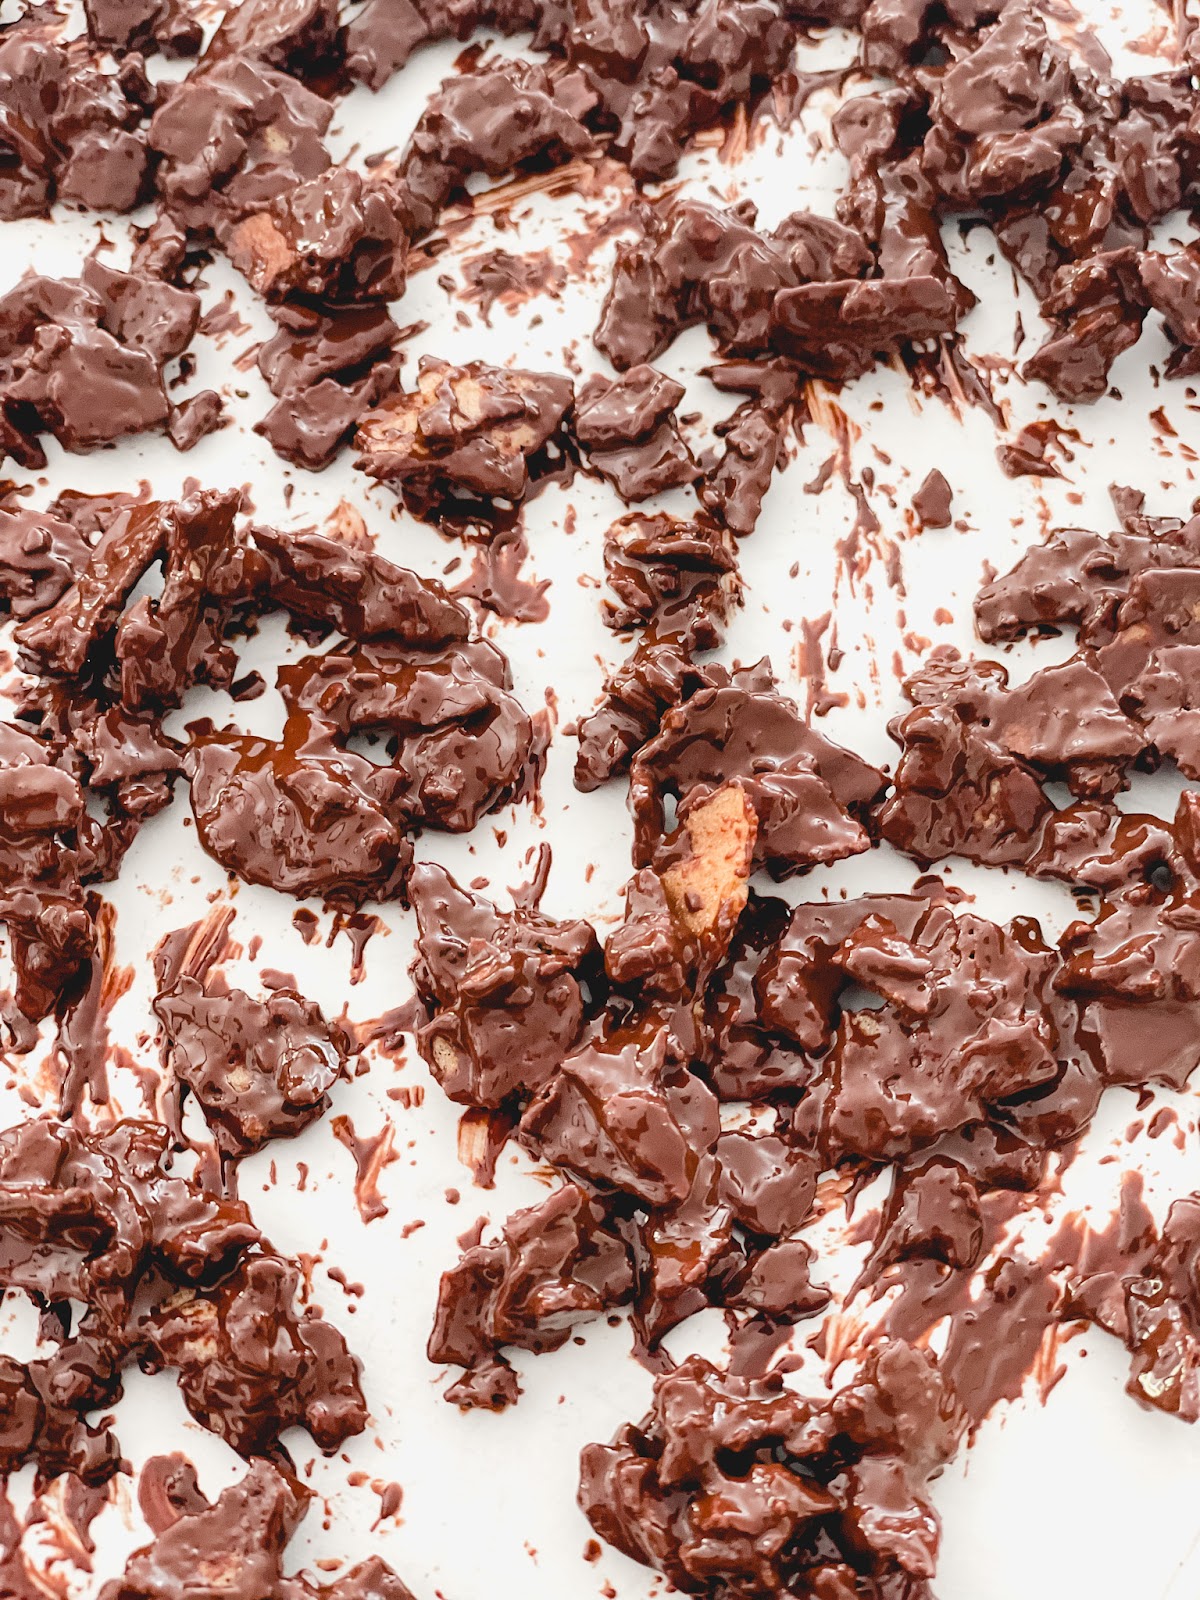
Caramel cone crunch cookies are my cookie version of the popular Ben & Jerry’s “Americone Dream” ice cream. It’s one of my favorite ice cream flavors and I knew it needed to be transformed into a delicious cookie! The ice cream is a vanilla base with fudge-covered waffle cone pieces and swirls of caramel. To mirror the flavors of the ice cream, I first decided to crush up some waffle cones and coat them in a thin layer of dark chocolate. For the caramel, I went with a soft caramel candy to get those melty pools of creamy, caramelly goodness.

I went through some trial and error when it came to the caramel in this cookie. It needed to be a soft caramel that was soft and gooey, as opposed to a sticky, hard caramel candy. I found that Werther’s soft caramels are the way to go but the trick is to refrigerate the dough overnight for the best results and even better flavor. One thing is for sure, no matter how these cookies looked in any of my test batches, they still were absolutely delicious every time!

Ingredients for Caramel Cone Crunch Cookies
There are a few items you may not have on hand so let’s go over them.
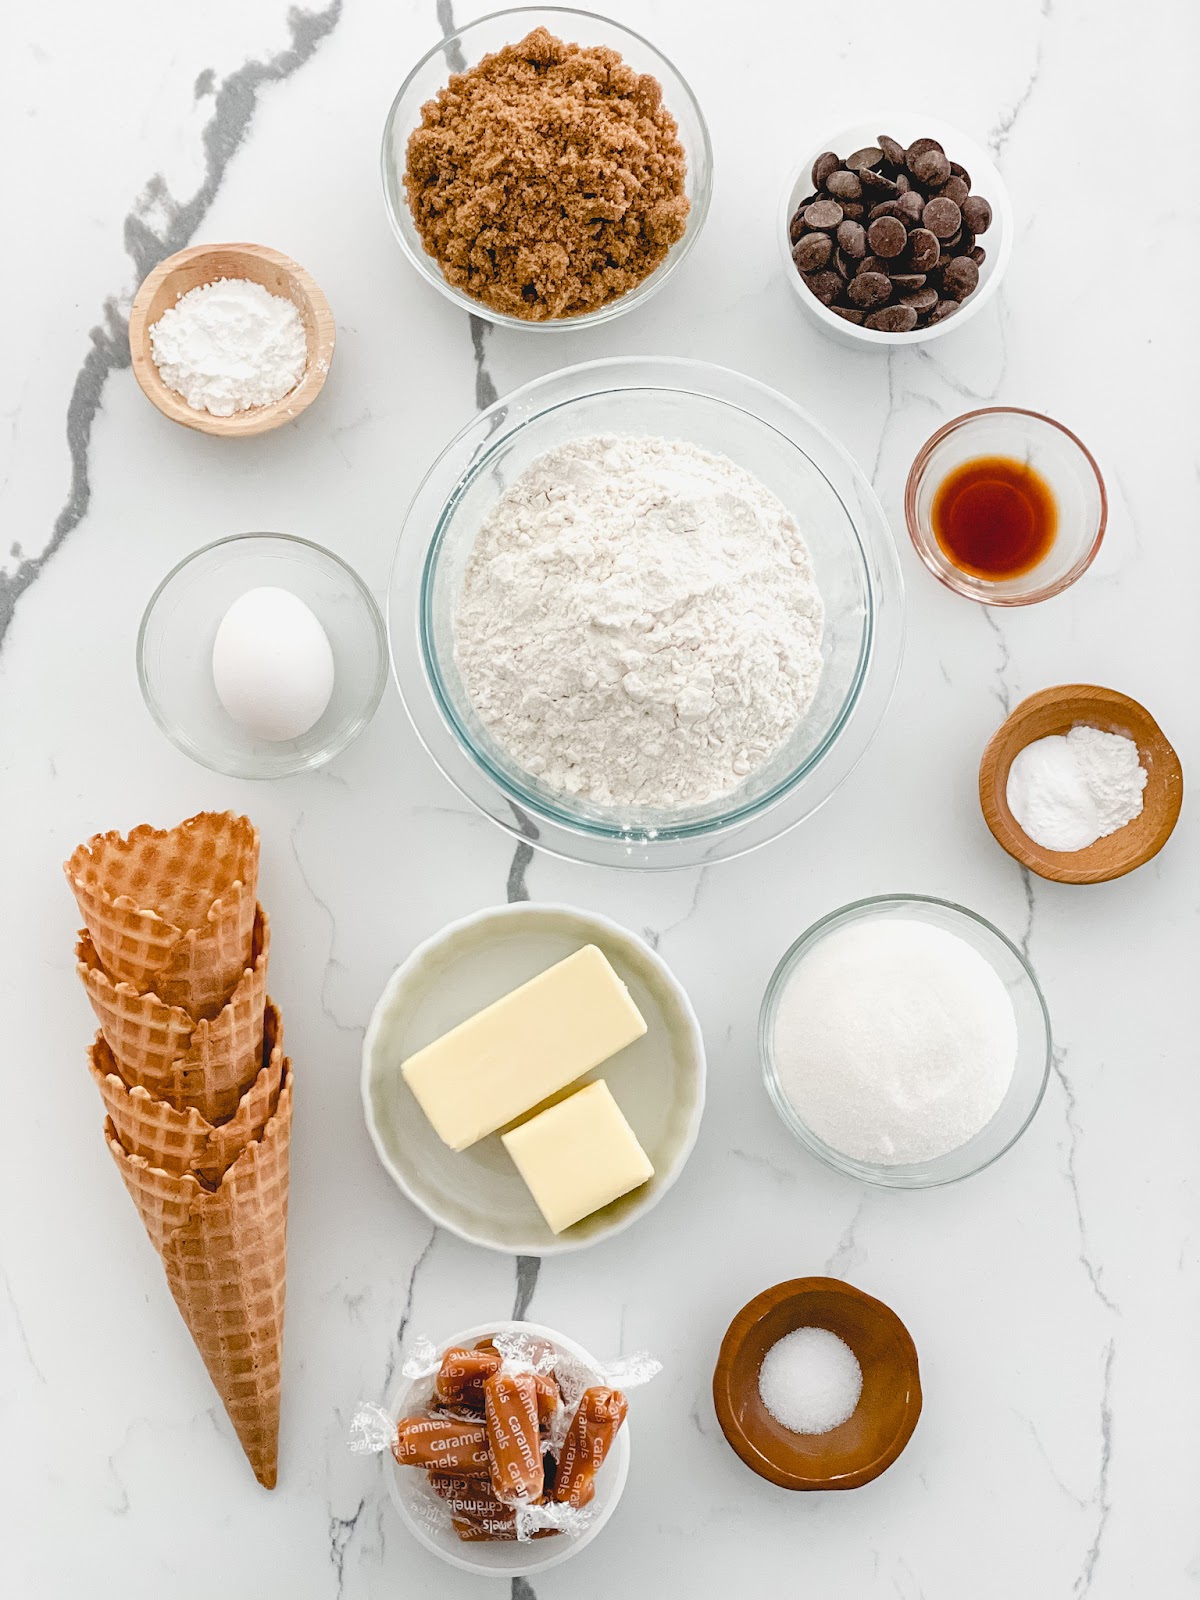
- Waffle Cones: You’ll find these by the ice cream section at the grocery store, or where all the ice cream toppings are sold. Sugar cones would work too if that’s all you can find but I don’t recommend using cake cones. If you’re feeling ambitious and have the right equipment, you could even make your waffle cones!
- Chocolate Chips: I like to use dark chocolate – this pretty much goes for most of my baking recipes. One that’s in the 60% – 72% cacao range is my go-to. It’s just my preference because I love how the more bitter chocolate offsets the sweetness, and with the caramel in this recipe, it’s a perfect balance. You can use semi-sweet instead if you want slightly sweeter chocolate.
- Caramels: I tried a few different caramels and determined that I like Werther’s soft caramels in these cookies. They create the perfect puddle of gooey caramel, without being too hard or sticky. The caramels do tend to make the cookies spread in the oven which is why I recommend refrigerating the dough before baking it. You may still end up with some oozing caramel but who doesn’t love a little chewy caramel puddle?!

How to Make Caramel Cone Crunch Cookies
1. Make the Chocolate Covered Waffle Cone Pieces. First, you’ll crush up the waffle cones into bite-sized pieces. Then melt your chocolate, add the waffle cone pieces and coat them evenly. Spread out the chocolate-covered waffle cone pieces on a piece of parchment. I like to freeze them so they set up quickly and then break up any large pieces by crushing them with a rolling pin. This way you have the perfect bite-size pieces for the cookies.
2. Mix the cookie dough base. This is my simple and classic cookie dough base. It starts with creaming butter, sugar, and brown sugar. You’ll add an egg and vanilla before adding the dry ingredients and mix-ins.
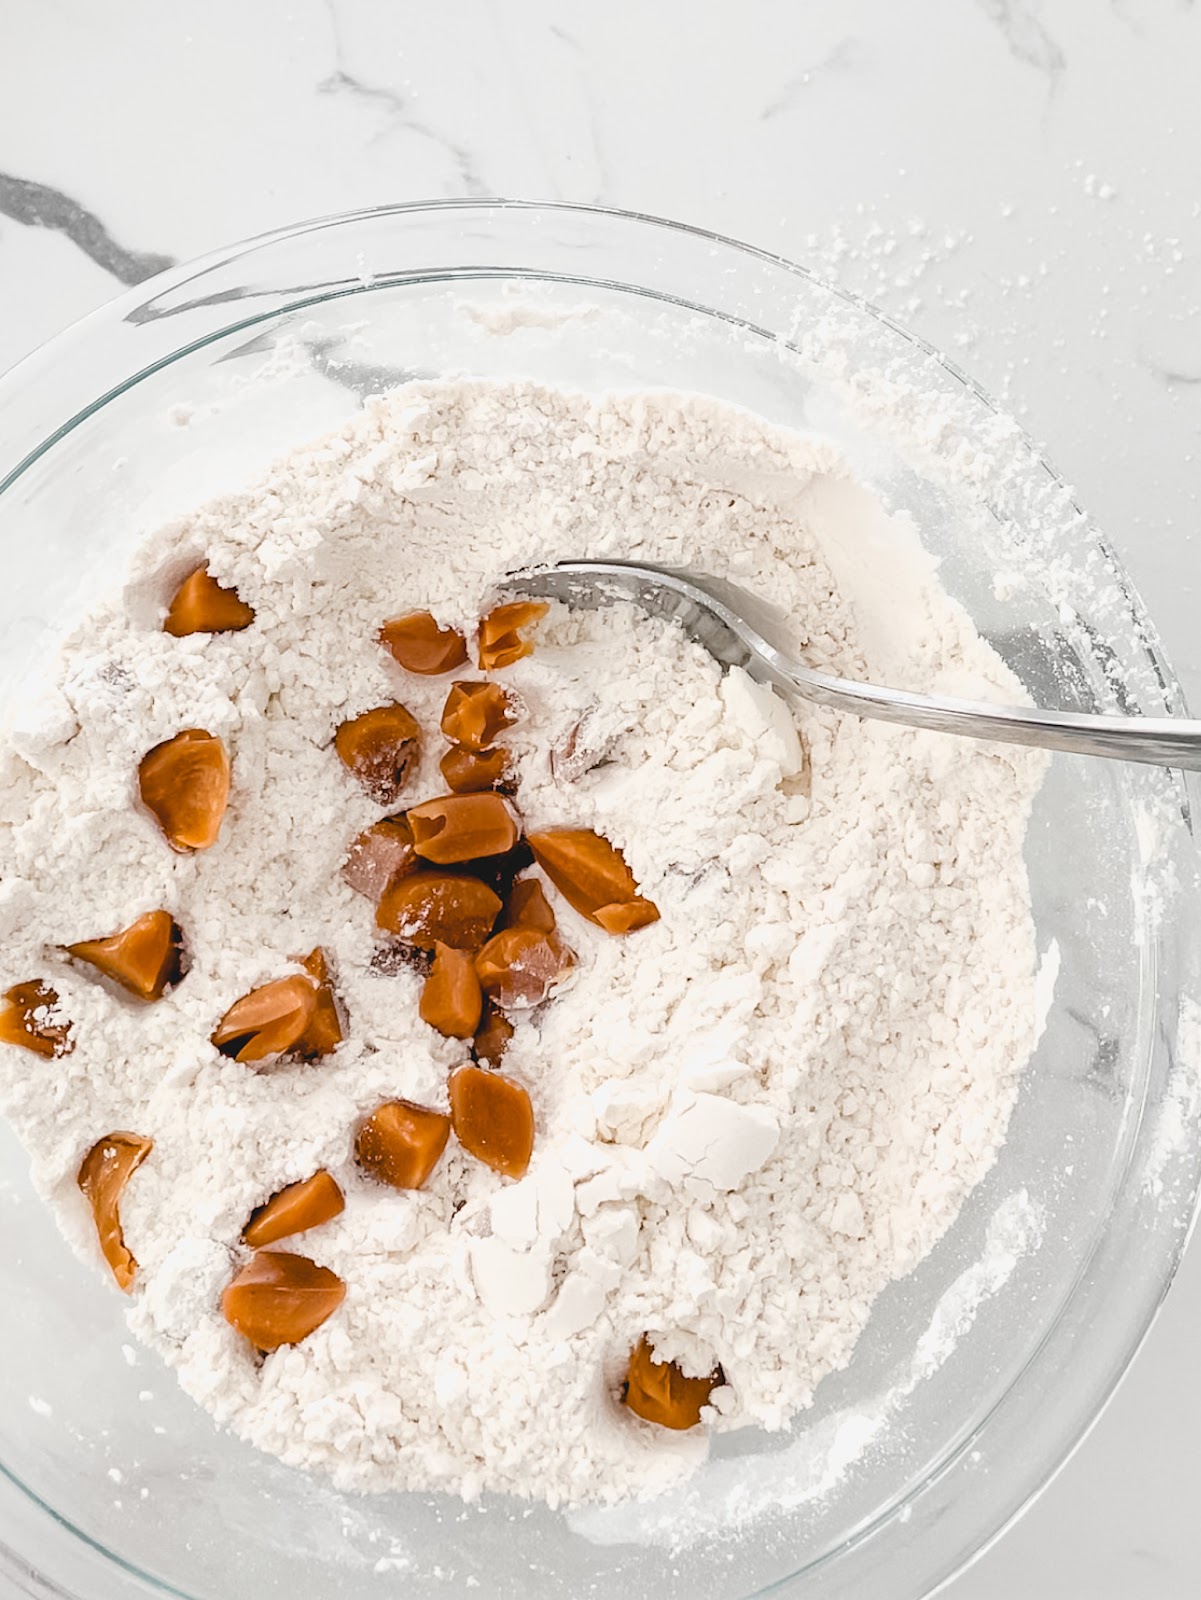
3. Coat the caramels in flour. I cut up the caramels into smaller pieces using kitchen scissors and I like to do this right over the bowl of dry ingredients so the caramels get coated in the flour, which will help them from sticking together. Then add it all, plus your crushed-up waffle cone pieces, to your cookie dough base.
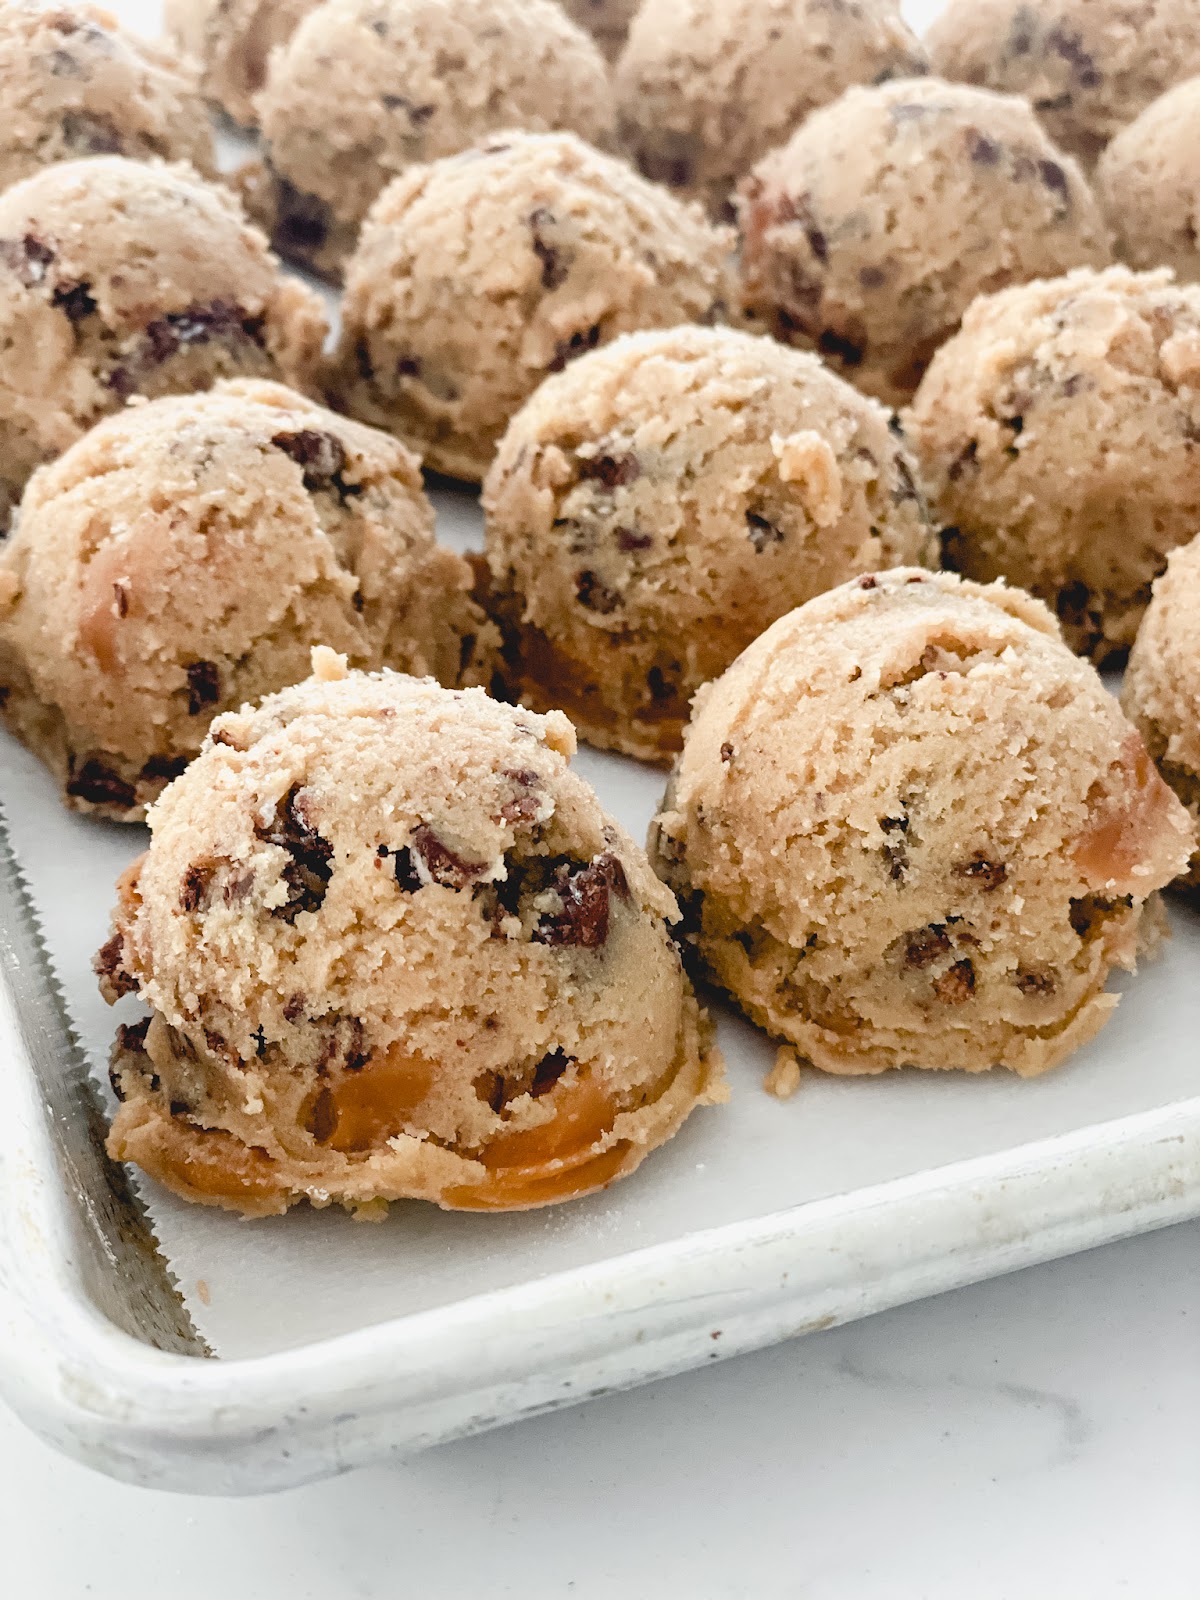
4. Scoop the cookies and refrigerate. I like to use a fairly big scoop for these cookies since there are so many chunks of the mix-ins that you want to make sure each cookie gets. The scoop I use is this one, which is size 24 and holds 1.33 ounces, or about 3 Tablespoons. Refrigerating the dough will help the cookies and especially the caramels not to spread too much so you still have a nicely shaped cookie. At least 2 hours of chill time or overnight is best.
5. Bake the cookies. After the dough has been chilled, bake them for about 10 minutes. If your cookies spread too much or the caramel seeps out, you can use a round metal cutter to help shape the cookies as soon as they come out of the oven. Cool slightly and then they’re ready to be devoured!

Tips for the Best Caramel Cone Crunch Cookies
- Chop the caramels. The Werther’s caramels I like to use are a little big so I’ve found that it’s best to chop each caramel into 4-5 pieces so there are pieces of caramel in every cookie. I use kitchen scissors to make this go super quick and chop them right over the bowl of dry ingredients. Be sure to wait to unwrap the caramels until you’re ready to use them so they don’t stick together, otherwise, you’ll end up with one big sticky caramel cluster!
- Don’t skip refrigerating the cookies. I like to refrigerate most of the cookie doughs I make. Letting the dough sit allows the flour to absorb into the dough and the flavors to fully develop for an even better-tasting cookie. For this recipe, it’s also necessary because of the soft caramels. The caramels melt quickly and bubble out of the cookie when the dough isn’t chilled. It’s still a delicious cookie but they spread more and the cookies won’t look as uniform. I recommend refrigerating them for at least 2 hours but prefer chilling them overnight.
- Reshape the cookies if needed. Inevitably, some of the caramels are still going to ooze out the sides slightly while baking. If you want a perfectly shaped cookie, just use a round metal cutter to gently push the caramel back into place and reshape the cookie. The caramel and the dough will start to stiffen as it cools down so be sure to do this step immediately after the cookies come out of the oven.

Waffle cones and caramel scream summer to me so I think there’s no better way to start the season than with these Caramel Cone Crunch Cookies. Happy cookie baking!
Caramel Cone Crunch Cookies
Ingredients
- ½ cup (98g) dark or semi-sweet chocolate chips
- 3 waffle cones (about 60g), crushed
- ¾ cup (170g) unsalted butter, at room temperature
- ¾ cup (152g) brown sugar
- ½ cup (108g) granulated sugar
- 1 large egg, at room temperature
- 1 teaspoon vanilla extract
- 2 cups (260g) all-purpose flour
- 1 Tablespoon cornstarch
- 1 teaspoon baking soda
- ½ teaspoon baking powder
- ½ teaspoon salt
- 16 individaul Werther’s soft caramels
Instructions
- Heat the chocolate in the microwave in 20-second increments, stirring in between until melted. Add the crushed waffle cones to the melted chocolate and stir until the pieces are coated.
- Spread the mixture as evenly as possible onto a baking sheet lined with parchment. Freeze until chocolate is set.
- In the bowl of a stand mixer fitted with a paddle attachment, cream the butter, brown sugar, and granulated sugar until fluffy and light in color, about 2 minutes.
- Scrape the bowl well then with the mixer on low speed, add the egg and vanilla. Mix until well combined. Scrape the bowl again.
- In another bowl, combine the flour, cornstarch, baking soda, baking powder, and salt. Using kitchen scissors, cut each caramel into 4 or 5 pieces, allowing them to fall into the bowl of flour. Coat the caramels with the flour mixture to prevent them from sticking together.
- Add the flour with the caramels to the mixing bowl. Mix until only a few streaks of flour remain.
- Break up the chocolate covered waffle cones into smaller pieces and add to the bowl. Mix just until all the ingredients are combined.
- Scoop the cookies onto a baking sheet lined with parchment paper, using a 3 Tablespoon (size 24 or 1.33 oz.) cookie scoop. Cover with plastic wrap and refrigerate for 2 hours or overnight before baking.
- Preheat oven to 350°F. Line 2 baking sheets with parchment paper or a silicone mat. Place the chilled cookie dough scoops on the prepared baking sheets, spacing them at least 2 inches apart.
- Bake for 10-12 minutes or until the edges are set and lightly golden brown. Use a large round metal cutter to reshape the cookies and push in any caramel that leaked out. Allow to cool for at least 10 minutes and enjoy!
Can you make your own caramel?
You can but it needs to be just the right consistency. You’ll need a thick, chewy caramel candy, not caramel sauce.
Hi, was wondering if you can use Caramel Baking chips in lieu of wrapped caramels? Ty
Hi Elena, I’m sure those would work just fine, although I haven’t tried it myself. You won’t get the same gooey caramel texture but I think the same flavors would be there!
Do you know how I could modify this recipe for high altitude? Look so delicious!!!
Thank you! I unfortunately don’t have any experience with high-altitude baking but I believe there are several factors. King Arthur Flour has a really helpful post on high-altitude baking that I recommend looking into!
Could you mix in the chocolate chips and waffle cone pieces separately?
Hi Helen! Yes, you can definitely mix them in separately. These cookies were inspired by the ice cream flavor with chocolate covered waffle cone pieces but either way would be delicious!
So disappointing. I followed the recipe exactly as written and these cookies are flat, spread out, tasteless messes.
Hi Khris, I’m sorry these cookies didn’t work out for you. The caramels do tend to spread out in the oven so it’s important to refrigerate the dough for at least 2 hours. If you want the cookies perfectly round, it may also still be necessary to reshape them slightly once they come out of the oven, as mentioned in the “tips” section of the post. I’d also double check the caramels you used – Werther’s soft caramels are what I tested the recipe with and the consistency would definitely change if you used another kind.
Can this dough be made in advance and frozen. If yes, can they be baked frozen?
Hi Sherry! Yes, the dough can be made in advance and frozen. I haven’t tried baking these from frozen myself but I’d recommend lowering the oven temp about 20 degrees and adding a few minutes to the baking time.
This turned out amazing. I chilled for 2 hrs in the refrigerator. Baked them about 10 to 12 min just until slightly brown. They had a little caramel come out the sides but as soon as I took them out I would shape the cookies with the back of a spoon around the edges to make round. I did that a few times until they began to set. While they are warm I took a few chopped sugar cones and put on the top with some crushed heath bars. Soooo good.
Thank you Laura! So glad to hear that you enjoyed these cookies and had such success with the chilling and shaping!
Made these, followed the directions to “T”… and unfortunately they look like they exploded. The caramel leaked out, but there is noway to “push it back it”, there’s nothing to push it back into, the cookie itself is gone, not even flat, it looks like a crater. so sad and disappointing, since they took so much time and effort.
Hi Cynthia, I’m so sorry to hear these didn’t work our for you! That’s such a frustrating outcome after putting in so much time. These cookies can be a bit finicky, and the caramel tends to leak out when the dough is too warm. I’m not quite sure about what would create craters in the cookies – but sometimes expired baking soda or baking powder can lead to issues like that. I also recommend using a kitchen scale to weigh your ingredients, for best results.
I followed the recipe exactly, measured by weight, refrigerated overnight and used an oven thermometer to check baking temperature accuracy. At 12 minutes cookies were still greasy raw in the middle so added 2 more minutes to time. As other commenters noted, cookies spread so much that trying to push them back into a round shape causes the dough edges to tear and buckle. I really like the flavor concept though so will try again with a different dough base and also add more crushed cone for texture.
Hi Anna, I’m sorry to hear these cookies didn’t turn out as expected. I haven’t personally run into this issue so it’s hard to say exactly what caused the excessive spreading. One factor that made a big difference during testing this recipe was the type of caramels used – specifically Wether’s soft caramels, so that may be something worth double-checking. I will have to try to replicate this issue with the recipe. I appreciate you sharing your feedback.
Can you make this into a 4 ounce cookie? What would the bake time be? Thanks!
Hi Lori, I haven’t tired making these into a 4-ounce cookie but I think that would work fine! For baking time, I would start at 12-14 minutes and continue to add 1-2 minutes at a time as needed.
I recently made this recipe and it turned out fantastic! It is a very creative idea when you are looking for something different and exciting to try. Highly recommended!
So glad that you enjoyed these! 😊