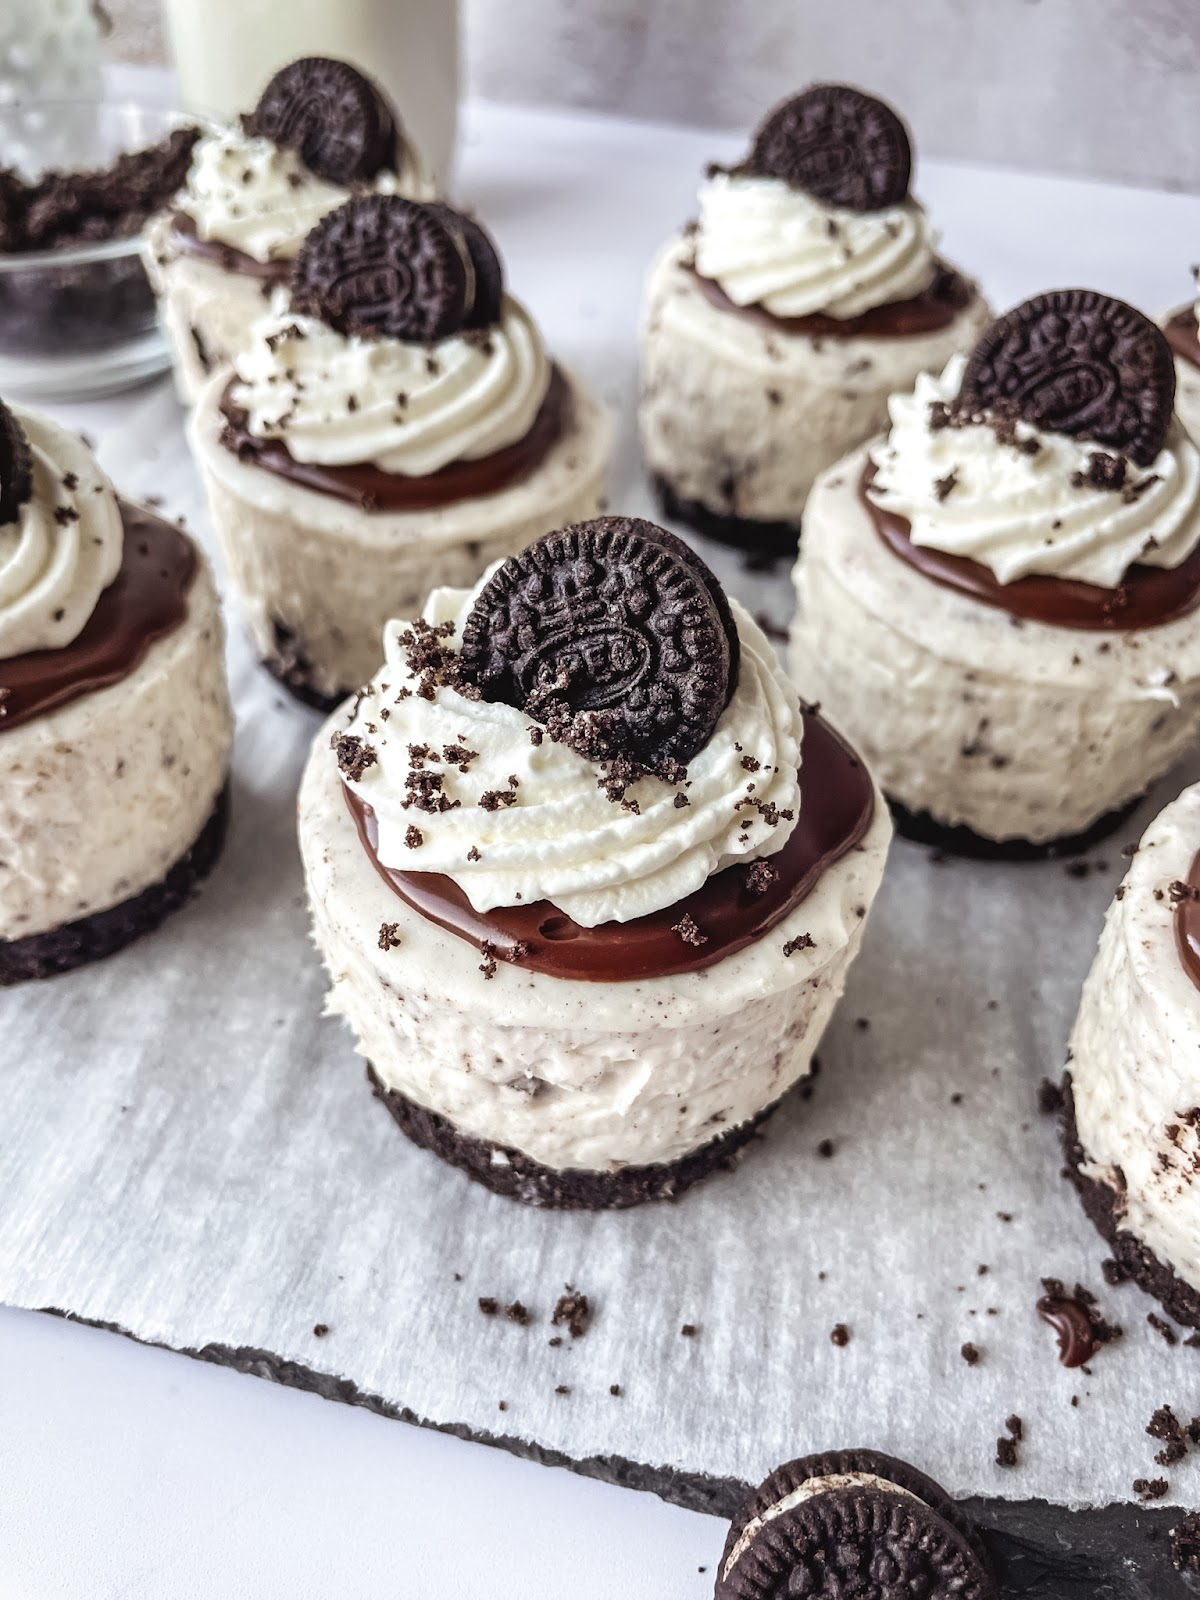
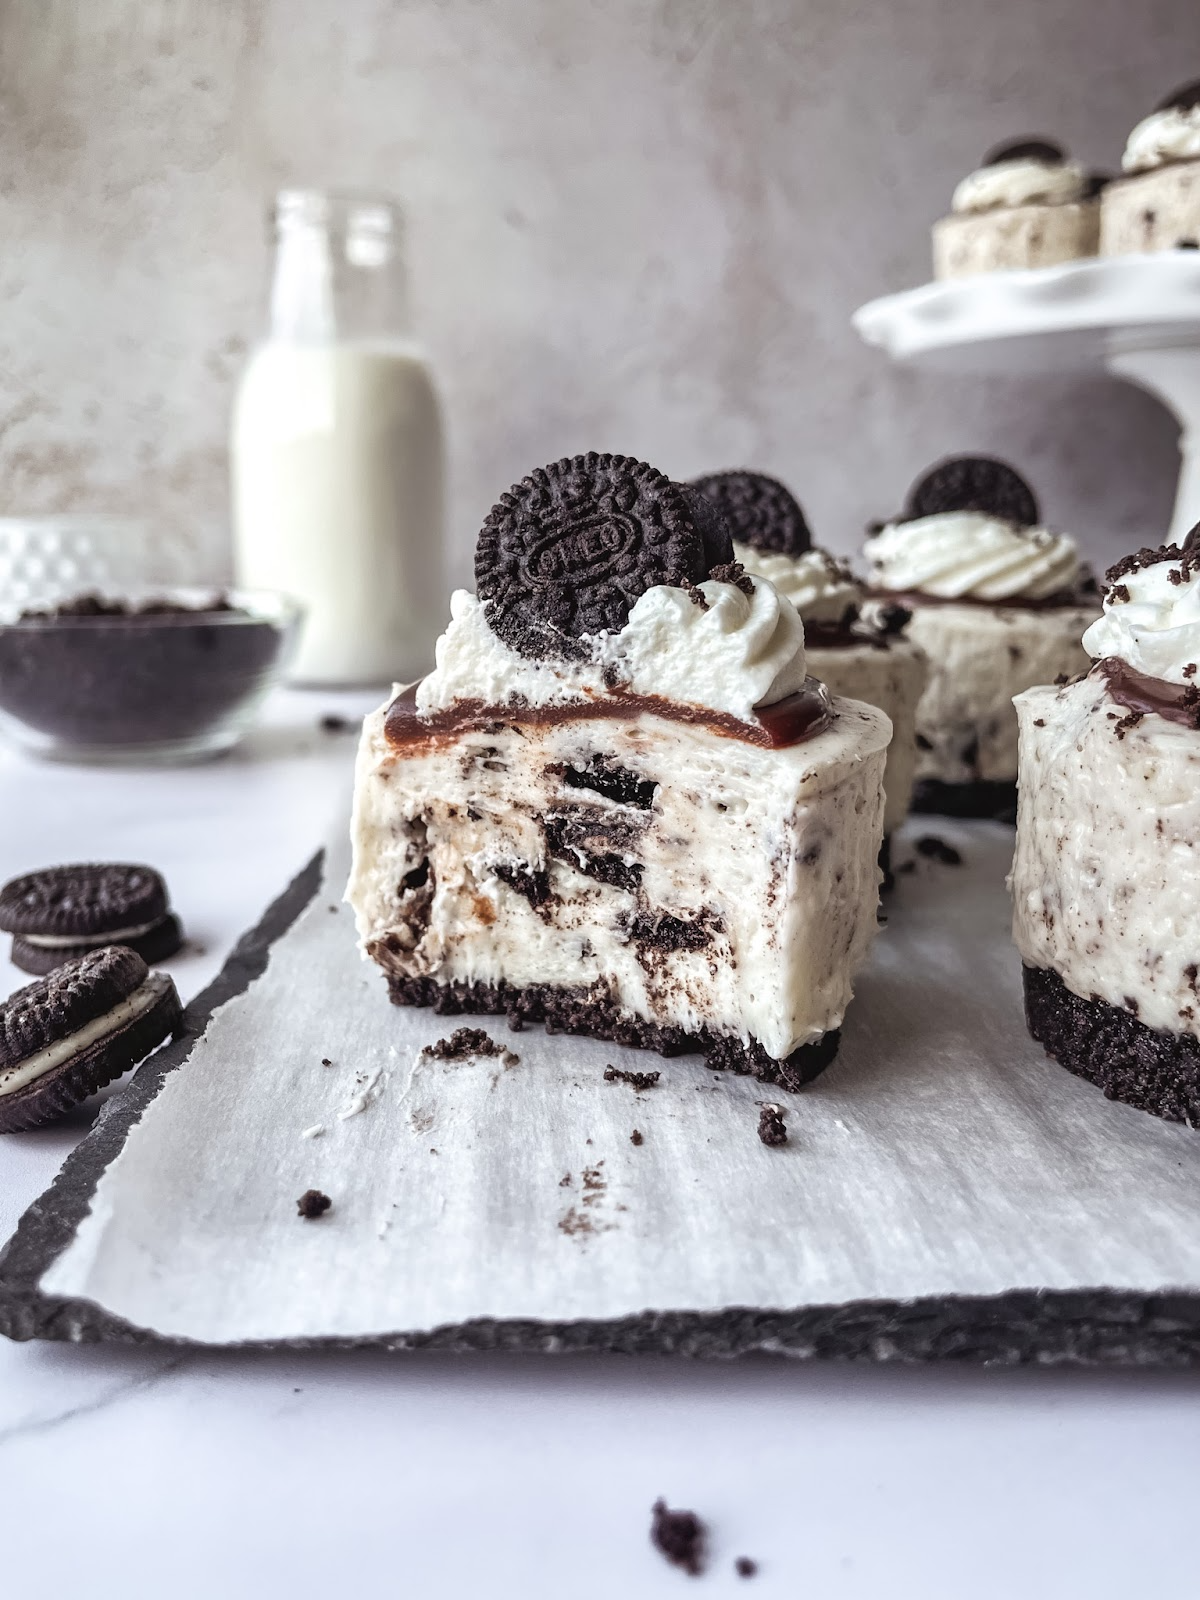
Mini Oreo Cheesecakes
An Oreo cookie crust topped with a light, creamy Oreo cheesecake filling, finished with a smooth chocolate ganache. These no-bake Mini Oreo Cheesecakes are not only adorable but delicious too!
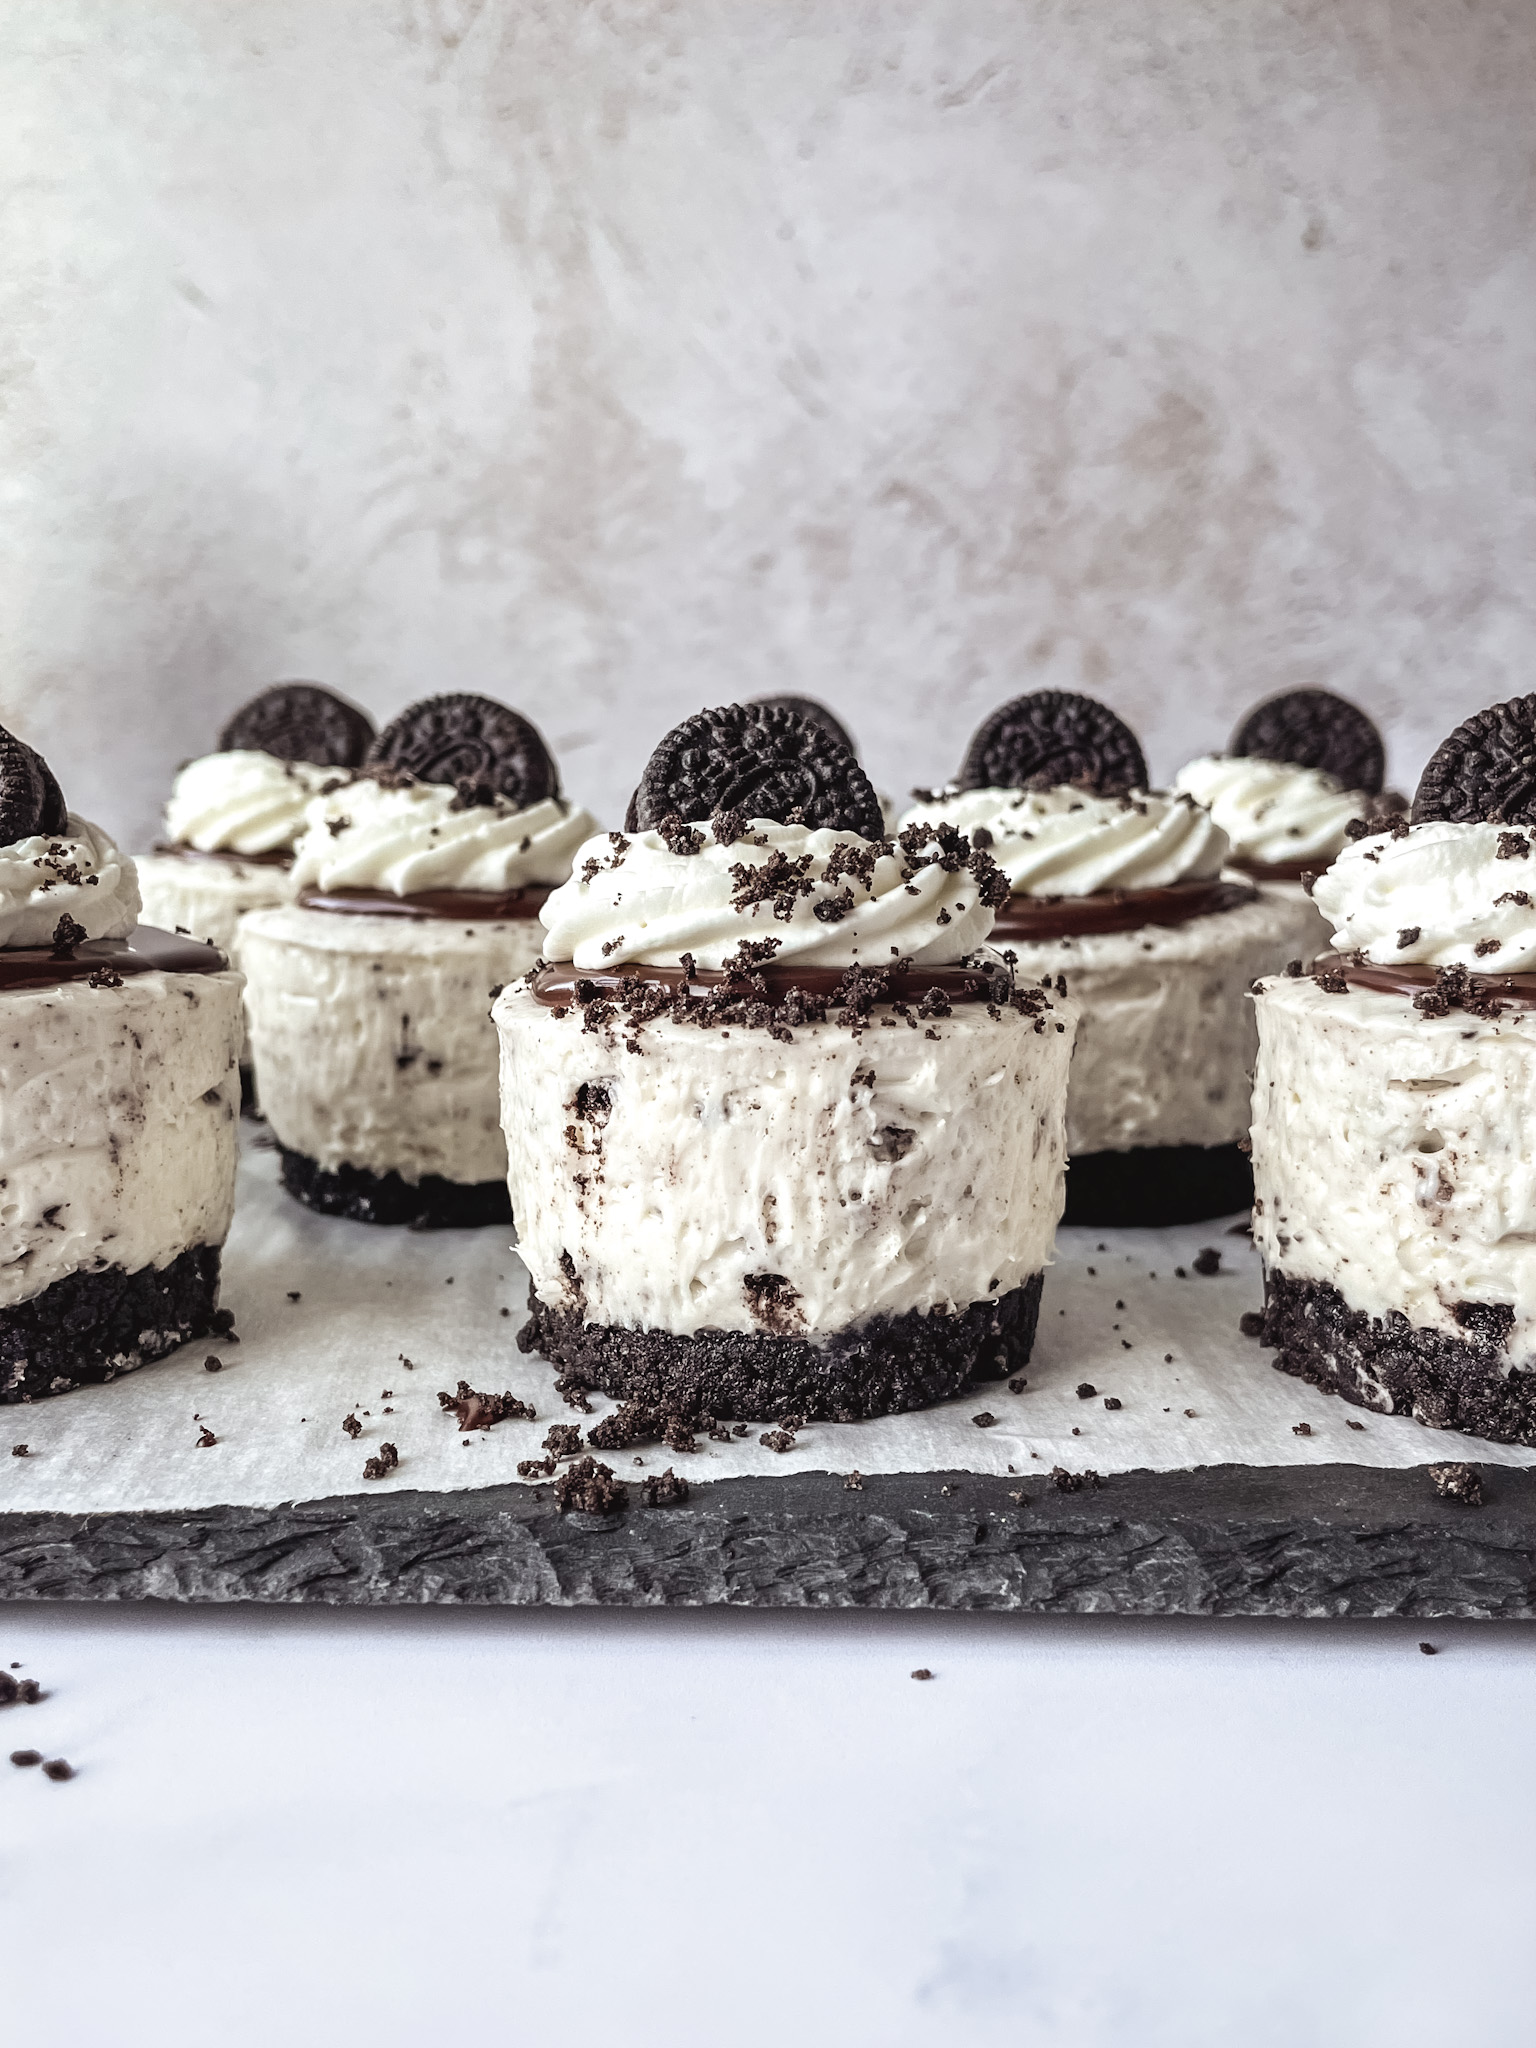
What’s better than a no-bake cheesecake recipe? A MINI no-bake OREO cheesecake recipe! These adorable little bite-sized cheesecakes start with an Oreo cookie crust, topped with a thick layer of light and creamy Oreo cheesecake filling, and finished with a layer of chocolate ganache. I like adding a dollop of whipped cream and a mini Oreo on top for the cutest presentation.
If you love mini cheesecakes, be sure to check out my Mini Biscoff Cheesecakes. These were a huge hit and quickly became the most popular recipe on my website. Many of you got so excited over the mini cheesecake pan with the removable bases that popped right out so I knew another flavor was a must. With no eggs or baking required, these Mini Oreo Cheesecakes are simple, delicious, and perfect for when you just don’t feel like turning on the oven.
Helpful Tools
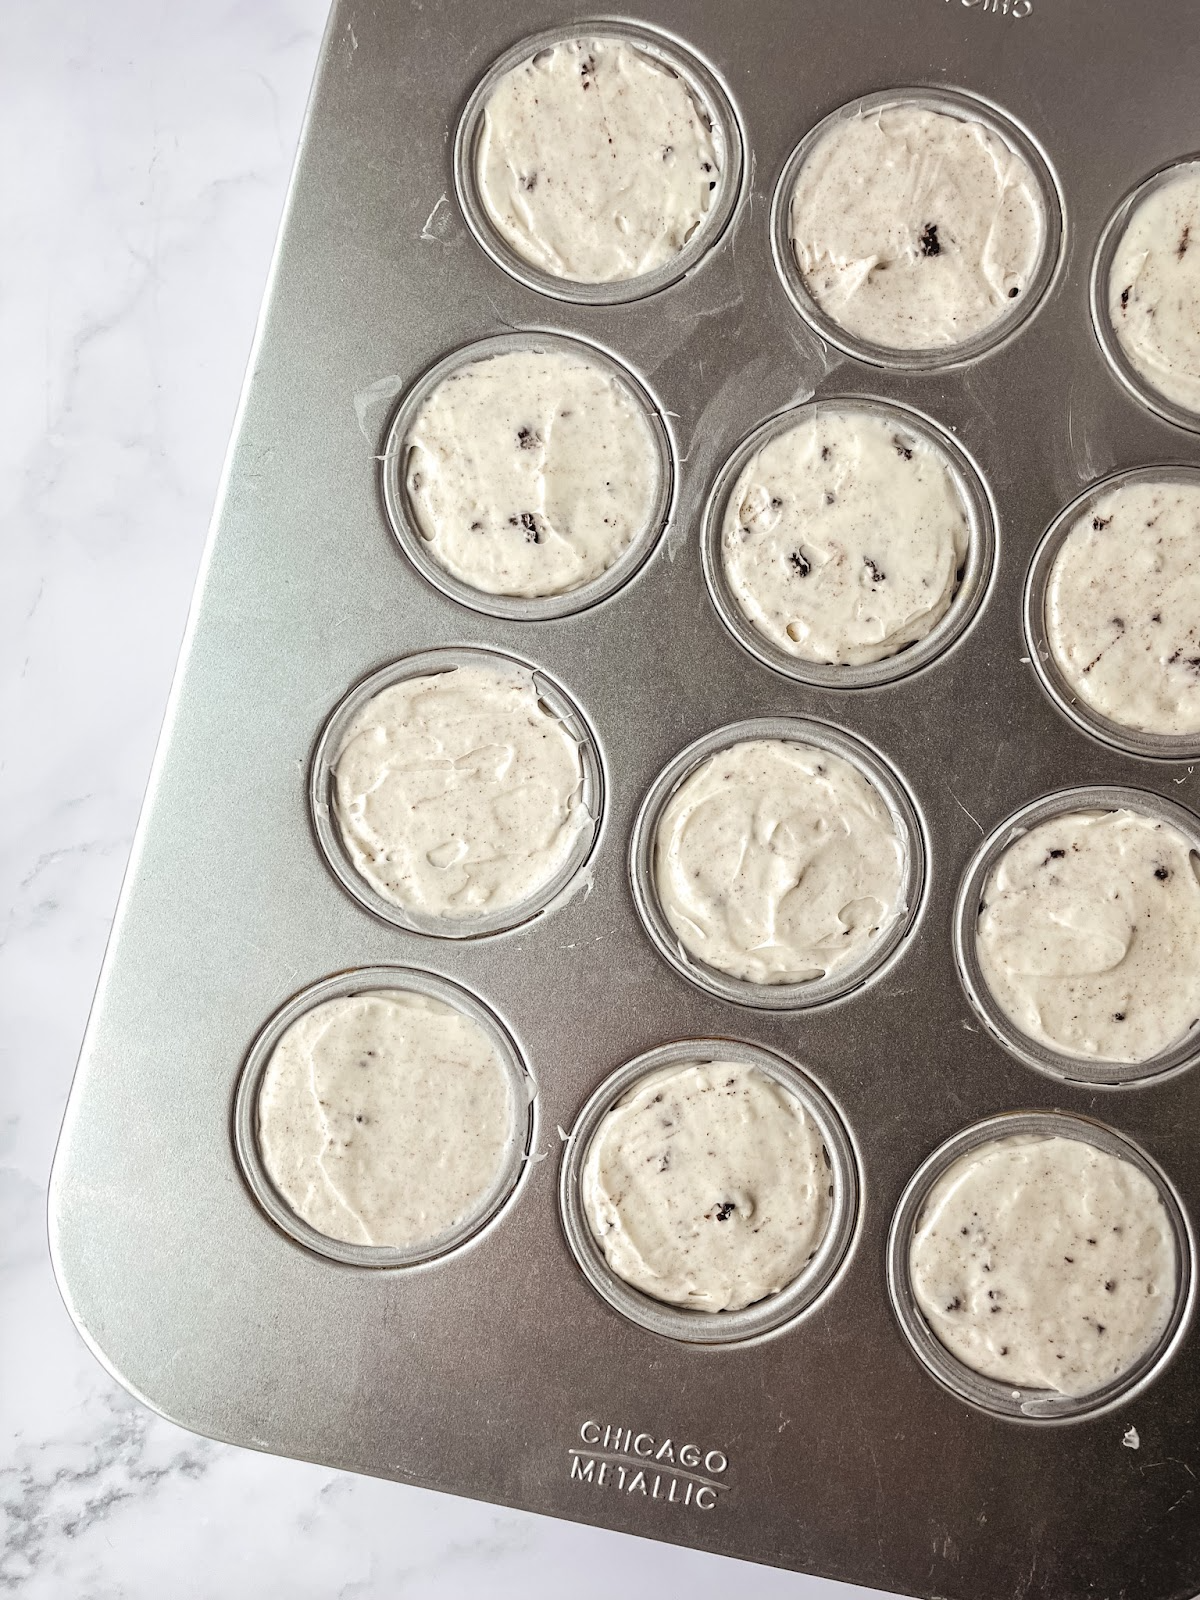
Mini Cheesecake Pans: This mini cheesecake pan is the trick to getting nice, clean straight sides on your little cheesecakes. You place the metal base in the bottom of each cavity in the pan, layer it with your crust, and filling and chill. Once chilled, just push the base up from the bottom until the cheesecake pops up through the top. They give you a perfect small personal serving size.
Tart Tamper: This tool isn’t necessary but I found it really helpful. The larger side of the tamper was the perfect diameter for compacting down the curst in the mini cheesecake pans. I think it would also be handy for tart crusts, or any other dessert that requires a compacted graham or cookie crust. If you don’t have a tart tamper, try using a shot glass or small flat-bottomed glass measuring cup that fits into the cheesecake tin.
Small Offset Spatula: This is such a handy tool to have in the kitchen for so many desserts. It’s great for spreading batters, doughs, or icings. I found it to be the perfect size to lightly smooth the top of the cheesecake after filing the pan, to make a nice level surface.
Piping Bags: These large piping bags come in handy for piping the filling into the tins. This is also the size I like to use when decorating cakes or piping frosting on cupcakes.

Tips for the Best Mini Oreo Cheesecakes
- Whip the cream on high speed. Once the heavy cream is added to the cream cheese mixture, it’s essential to whip it on high speed until it becomes very thick. The mixture should create a stiff peak when you pull the whisk out. Gently fold in the Oreos after so the mixture you don’t lose any of the air in the cheesecake.
- Refrigerate overnight. The cheesecakes need plenty of time to set up in the fridge. I recommend at least 8 hours or overnight. Any less than this and the cheesecakes will be very soft and most likely will not come out of the pan very well. You can also pop these in the freezer for 10-15 minutes after they have chilled completely in the fridge, to ensure they come out cleanly.
- Use a warm towel. When removing the mini cheesecakes from the pan, I’ve found it helpful to use a warm, damp rag or towel to help loosen the sides of the cheesecakes. Simply wet a towel with warm water and rub it around the base of each individual tin then pop it out from the bottom. This will help give you those clean straight sides.

Mini Cheesecake FAQs
What can I use if I don’t have a mini cheesecake pan?
The cheesecake pan with removable bottoms is handy but not required for this recipe. Instead, you can use a standard muffin tin with cupcakes liners. You can use a mini muffin pan or a standard muffin tin for slightly larger cheesecakes. The liners will make them easy to remove since you won’t have the removable bottom.
What can I do if my cheesecakes aren’t coming out of the pan?
If you have trouble removing the cheesecakes from the mini pan, rub a warm, damp towel around the exterior sides of each tin right before pushing up the base. I found this method to work best, especially to get nice clean sides.
How do you get the base off of the crust?
The metal removable bases should pull away from the crust easily after you have pushed the cheesecake out of the tin. There’s plenty of butter in the crust to help it pull away and greasing the bottom of the pan before adding the curst helps too.
Why didn’t my cheesecakes set up?
If you’ve chilled the cheesecakes for 8 hours or overnight and they are still too soft or not set when you remove them from the pan, it’s most likely because the heavy cream was not whipped enough. You can pop the pan in the freezer until the cheesecakes have firmed up enough to remove from the pan.
How do I store mini cheesecakes?
Store the finished cheesecakes in an airtight container in the fridge for up to 3 days or in the freezer, for up to 3 months. Let them thaw in the fridge for a few hours, before serving. Wait to add the whipped cream and mini Oreos until right before serving.
More Cream Cheese Desserts That You’ll Love
- Strawberry Crunch Cheesecake
- Vanilla Cupcakes with Chocolate Frosting
- Baileys Irish Cream Cheesecake Brownies
- Ginger Molasses Cookie Sandwiches
- Apple Cheesecake Pop-Tarts
Lastly, if you make these Mini Oreo Cheesecakes, be sure to leave a comment below and tag @sweetkitchencravings on Instagram or TikTok. Or if Pinterest is more your style, you can save my recipes to your collection there. Happy mini cheesecake making!

Mini Oreo Cheesecakes
Ingredients
For the Oreo Crust
- 18 Oreos
- 4 Tablespoons (56g) butter, melted
For the Oreo Cheesecake Filling
- 24 oz (3 blocks or 681g) cream cheese
- 2 cups (230g) powdered sugar
- 1 Tablespoon vanilla extract
- 1 ½ cups (360ml) heavy cream
- 12 Oreos, roughly chopped or crushed
For the Ganache
- ⅓ cup (84g) dark chocolate, chopped
- ⅓ cup (84g) heavy cream
For the Topping (optional)
Instructions
- Oreo Crust: In a food processor, add the Oreo cookies and pulse to fine crumbs. Add in the melted butter and pulse until the mixture is fully combined.
- Lightly coat two 12-count mini cheesecake pans with cooking spray. Add about 1 Tablespoon of the crust mixture to each cheesecake tin and press firmly to compact it in the bottom. Place the pans in the fridge to chill while you make the cheesecake filling.
- Cheesecake Filling: In the bowl of a stand mixer fitted with a paddle attachment, beat the cream cheese and powdered sugar together until well combined and smooth. Mix in the vanilla.
- Scrape the bowl and switch to the whisk attachment. With the mixer on low speed, slowly stream in the heavy cream. Once the cream is incorporated, turn the mixer to high speed and whip until the mixture is thick and looks like stiff peaks, about 20 – 30 seconds. Remove the bowl from the mixer and gently fold in the Oreo pieces.
- Use a large piping bag to fill the prepared pans to the top with the cheesecake filling. Lightly smooth the tops of the cheesecakes with a small offset spatula. Refrigerate for 8 hours or overnight.
- Once the cheesecakes are set, remove them from the tins by gently pushing the cheesecakes up and out from the bottom, then remove the metal base.
- Ganache: Combine the chocolate and heavy cream in a heat-safe dish and warm in the microwave in 20-second increments, stirring in between until melted. Add a spoonful of the warm ganache to the center of each cheesecake and allow to cool slightly.
- Pipe a dollop of whipped cream onto each cheesecake and top with a mini Oreo. Serve and enjoy!
Notes
- Storing: Store cheesecakes in an airtight container in the fridge for up to 3 days or in the freezer (without whipped cream on top) for up to 3 months.
- Cheesecake Pan: See the “Helpful Tools” in the post above for where to purchase the mini cheesecake pan, as well as an alternative to use instead.